


| Codeforces Round 849 (Div. 4) |
|---|
| Finished |
Alperen is standing at the point $$$(0,0)$$$. He is given a string $$$s$$$ of length $$$n$$$ and performs $$$n$$$ moves. The $$$i$$$-th move is as follows:
- if $$$s_i = \texttt{L}$$$, then move one unit left;
- if $$$s_i = \texttt{R}$$$, then move one unit right;
- if $$$s_i = \texttt{U}$$$, then move one unit up;
- if $$$s_i = \texttt{D}$$$, then move one unit down.
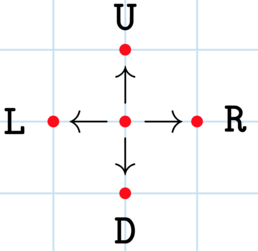 If Alperen starts at the center point, he can make the four moves shown.
 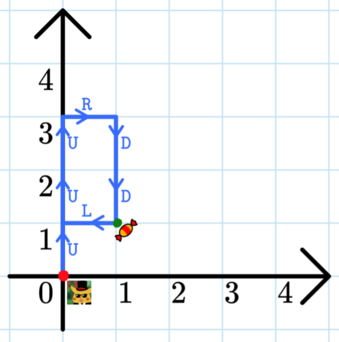 Alperen's path in the first test case.
 The first line of the input contains an integer $$$t$$$ ($$$1 \leq t \leq 1000$$$) — the number of testcases.
The first line of each test case contains an integer $$$n$$$ ($$$1 \leq n \leq 50$$$) — the length of the string.
The second line of each test case contains a string $$$s$$$ of length $$$n$$$ consisting of characters $$$\texttt{L}$$$, $$$\texttt{R}$$$, $$$\texttt{D}$$$, and $$$\texttt{U}$$$, denoting the moves Alperen makes.
For each test case, output "YES" (without quotes) if Alperen passes the candy, and "NO" (without quotes) otherwise.
You can output the answer in any case (for example, the strings "yEs", "yes", "Yes" and "YES" will be recognized as a positive answer).
77UUURDDL2UR8RRRUUDDD3LLL4DUUR5RUDLL11LLLLDDRUDRD
YES
YES
NO
NO
YES
YES
NO
In the first test case, Alperen follows the path $$$$$$(0,0) \overset{\texttt{U}}{\to} (0,1) \overset{\texttt{U}}{\to} (0,2) \overset{\texttt{U}}{\to} (0,3) \overset{\texttt{R}}{\to} (1,3) \overset{\texttt{D}}{\to} (1,2) \overset{\texttt{D}}{\to} \color{green}{\mathbf{(1,1)}} \overset{\texttt{L}}{\to} (0,1).$$$$$$ Note that Alperen doesn't need to end at the candy's location of $$$(1,1)$$$, he just needs to pass it at some point.
In the second test case, Alperen follows the path $$$$$$(0,0) \overset{\texttt{U}}{\to} (0,1) \overset{\texttt{R}}{\to} \color{green}{\mathbf{(1,1)}}.$$$$$$
In the third test case, Alperen follows the path $$$$$$(0,0) \overset{\texttt{R}}{\to} (1,0) \overset{\texttt{R}}{\to} (2,0) \overset{\texttt{R}}{\to} (3,0) \overset{\texttt{U}}{\to} (3,1) \overset{\texttt{U}}{\to} (3,2) \overset{\texttt{D}}{\to} (3,1) \overset{\texttt{D}}{\to} (3,0) \overset{\texttt{D}}{\to} (3,-1).$$$$$$
In the fourth test case, Alperen follows the path $$$$$$(0,0) \overset{\texttt{L}}{\to} (-1,0) \overset{\texttt{L}}{\to} (-2,0) \overset{\texttt{L}}{\to} (-3,0).$$$$$$
